Wednesday, October 5, 2011

food face...


Last year I went to the National Gallery in D.C. and saw an awesome exhibition on Giuseppe Arcimboldo. His paintings are incredibly detailed and super interesting. I have been dying to do a project that relates to his art.

Finally, the time has come. 3rd grade is studying botany. They had a whole bunch of veggies brought to school and they studied, drew, dissected, and tasted all the different vegetables. When they were finished examining the veggies, I had them brought to art class. We learned about Mr. Arcimboldo and created some faces from the vegetables! So cool. It was also a great exercise in working groups and to get another use out the vegetables!


The final product... (all waste was composted and will be used in the school gardens!)


Artwork at the top of post:
Giuseppe Arcimboldo, Vertumnus, 1590

name tags...

Where oh where do you start with Kindergarteners? Well I like to dive right in with my first project (well technically my second proejct)...

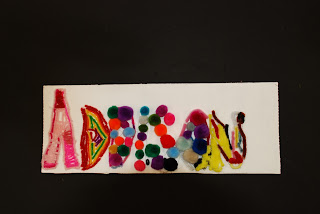
Name tags! Kinder kids start off learning the letters of the alphabet. So, I do a couple of projects that go hand in hand with letter learning.

I write each student's name on a piece of cardboard. They get to decorate the letter with different kinds of "stuff"... I have things like pompoms, feathers, string, noodles, pipe cleaners, beans, etc.


We look at the letters and how we know they are letters. What an outline is? What happens if something goes outside the letters? We also go over liquid glue use. How much is enough? What does too much look like?

The kids do a great job with this project!


More with letters soon...

Wednesday, September 14, 2011

cleaning up in the art room...

Cleaning up time...What else do I need to say??... it is always a hectic time in my room... and I am always searching for a way to organize the kids and myself.

Last year, I decided we needed to have a cleanup song. They kids would have the length of the song to get the room back together. I have the philosophy that art is messy and it's no problem if we make a big mess... but if you make the it you clean it up.

Cleanup song from last year...


Artist: Band of Horses
Song: Compliments
Album: Infinite Arms

Thank you Band of Horses for inspiring the youth to cleanup after themselves while shaking their shoulders and bobbing their heads...

Thursday, September 8, 2011

i'm backkkkkkk...

Hello again all!

It has been many a months since my last post. My apologies... I just left with no closing words to the end of the last school year. Summer was a much needed break and boy oh boy was it a good one. I left June 25th and did not return home until August 21st. Off I went on an exciting cross country adventure going to 19 different states plus British Columbia, drove 9771 miles, saw my roommate get married, slept in a tree house, went to the northwestern most point in the mainland US, swam in Californian rivers, hiked up a massive rock to see the delicate arch in Utah, camped at the Badlands, visited some amazing friends, meet new friends, and spent some beautiful time with my boyfriend and accomplice in this cross country escapade.


Fog
Highway 101, CA

Seclusion
Larrabee State Park, WA


Gray vs. Blue
Durango, CO

These are just a few of the fantastic moments from summer... but now it's time for art projects galore! A new year and new classes! I am now (proudly) Kinder - 6th grade and upper school art teacher! WOOOO... bring on the middle school:)

Thursday, May 26, 2011

space and aliens...

2nd Grade Space Unit... I love it!

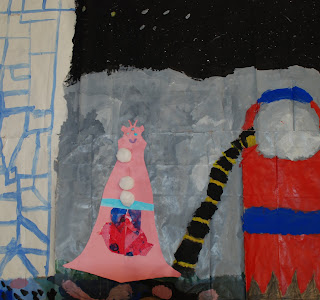
It means we get to do fun things with aliens. I usually do an oil pastel with warm and cool colors and the foreground, middle ground and background. BUT... I just did a pastel project with the kiddos, I decided a large scale painting was in order.

First, we created aliens symmetrical ones... from Deep Space Sparkle...


Next, the students had to each pick a different plant. They had to apply the knowledge about the plants to create the surface of the planet they chose. Depending on the planet it had to be cool or warm colors. We talked all about foreground, middle ground and background. The students need to include all three in there painting.

For their painting, I wanted them to be big. But I do not have large paper, so I opened up two brown paper bags and taped them together. It gave them a huge canvas to paint on.After the kids finished painted, they glued their alien onto the backgrounds.

They had a good time with this project and they turned out super fun!

Aliens and Planets...


These are out of this world... get it?! Hahahaha

windows down...

weather has arrived... this lovely song is the epitome of music that needs to be play in a car with the windows down. Try it... you will not be disappointed!


Artist: Bruce Springsteen
Song: Thunder Road
Album: Live

weather: wind

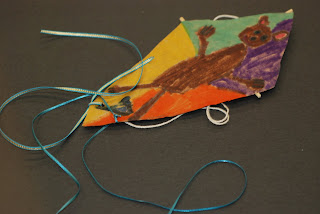
The last art and weather project was WIND! The students created kites! (And they actually worked!!!) These were super fun and the kids had a ball when it came time to fly them outside!

Shape was a reoccurring theme for this project too:) An added bonus!

To start this took a bit of prep on my part....
I hot glued two skewers in a cross. I also broke down paper bag from a grocery store and I cut them into pieces that were slightly bigger then the skewer crosses.

The next few steps were for the kids to do. They first had to create the diamond shape on the paper bag using the cross. Some of the kids had a really hard time holding the cross still while drawing the lines. I think it is good though to challenge them like this sometimes.

Next, they got to decorate the kite using any shapes. I allowed the to color with markers. Then they cut out their diamond and used liquid glue to attach the cross and diamond together. At this point they need to dry over night.

Back to the good ol' teacher... I attached the kite string to the back of all the kites so they would be ready for the next class. Next, I let the kids punch holes so we could add decorative strings... they choose the string and punched the holes, I tied them on to the kite.

Luckily it was a bit windy the day we finished:)


Friday, May 6, 2011

weather: rainbows

Here is the next stop in our tour - o - weather for first grade... Are you ready to get these kids super pumped, excited, electrified, psyched??? Well play this videoooooooo...


The kids really enjoyed this music video and it got them to start to understand the basics of rainbows... For this project, the kids made their own Roy G Biv man and rainbow scene.

This project was the odd man in my series of projects that interact with the weather. Cute and fun non the less!


Artist: They Might Be Giants
Song: Roy G Biv

Wednesday, April 27, 2011

weather: sun

We move from rain to sun...

This is one of my all time favorite projects! It works perfect with this unit too. They are traditionally called cyanotypes, but to the kiddos I call them sunprints.

What it is: Paper coated in light sensitive materials.
HUH? The paper is coated with these two chemicals: Potassium ferricyanide and Ferric ammonium citrate...when they are mixed together it becomes sensitive to light.

How it works: Items (leaves, flowers, cutouts, gadgets) are arranged on a template. This is a great opportunity to talk about composition and how items relate to one another in a piece of art...

Once the student have their composition laid out on the template, they are ready for the light sensitive paper. It is important that they move fast because the paper is effected the moment light hits it. Once they give the word they are ready, I give them the sunprint paper. They need to transfer their design onto the sunprint paper. Students need to carefully write their name on the paper once they have transferred their items.


How long: The items need to stay on the paper for a varying amount of time. It depends on the paper (if it is pre-coated or if you coat the paper yourself), the time, and the weather. Generally, it takes about 2-3 minutes. The paper changes color and once it looks silver it is done. 

Next: To stop the developing or to stop the sun from changing the paper it need to be submerged into a tub of water. I have the kids put it face down, so no more sun hit the paper. The extra chemicals need to be rinsed out revealing the image. 


Finally: The print takes a swim in a bath of water and hydrogen peroxide. Have the kids put their prints face up for this one... it is a show stopper. The print goes from a blue to a explosive bright blue right before your eyes... it is really neat... 


The product:


A nice outdoors activity!

weather: rain

]Guess what?!?! I am so excited about the next set of projects (weird right?! I am never excited about art projects!)

Anyway, the 1st grade studies weather and all its glory. I decided I wanted to create a set of projects that make the kids interact with the weather rather then just paint a picture of a rainy day. (Very tricky because you are relying on something that is very unreliable!)

The trick with this unit, is to have a backup plan, be very flexible and know it might not work out exactly as you plan!

I got the idea for this project from an artist name Ashley Lathe. He created these rain painting machines at the McColl Center for Visual Art. Watch this video and check out the creation of art with the help of rain.


First, I created paint shakers by punching small holes in the top with a tact. I filled these shakers up with powdered tempera paint.

I have the the luxury of getting an extra art class when needed. This is super important because you need a good rain for this project.

So, I went and got the kids on a super rainy day, showed them the rain machine video and let them know how it all goes down...

The students use the shakers and cover their paper with the tempera. They bring the paper outside to a drop cloth I have and let the rain do the rest! Simple, but the outcome is really beautiful!


 Neat huh?